This is the step that decides whether anything you've built actually reaches your family. It takes five seconds per record, and it's the one people mean to come back to and don't.
If you read one article about how your vault works, read this one.
Records and vaults are two different things
It helps to picture them separately.
A record is one real-world thing — a bank account, a passport, your will, the family dog's care instructions. You create it in the category where it belongs, fill in its fields, and optionally attach a document. That's the information.
A vault is a package for specific people. It has recipients and a delivery condition — who gets it, and when.
Assigning is the bridge between them. When you assign a record to a vault, you're saying “the people on this vault should receive this.” Until you do, the record exists but has no audience.
Assigning while you create a record
The easiest time to do it is right away, before you move on.
At the bottom of every record form — above the document upload — is a section headed ? Assign to vault — who can receive this record. Each vault you've built appears with its color dot, its name, and the people currently attached to it.
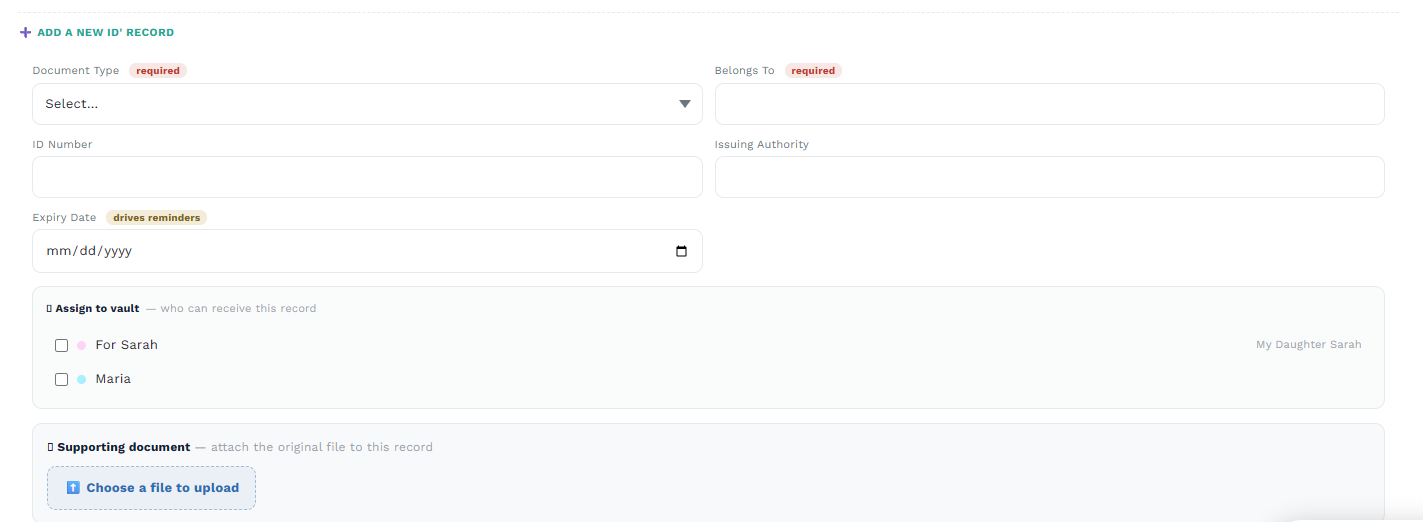
Tick every vault that should carry this record, then save. That's it — the record now reaches those people when the vault's delivery condition is met.
Assigning a record you already saved
If a record is already saved — or you skipped the step earlier — you don't need to redo the form.
- Find the record's card in its category
- Click the ⋮ menu in the card's top-right corner
- Choose Assign to vault
- Tick the vaults it should belong to, and save
Nothing else about the record changes — the fields and the attached document stay exactly as they were. You're only changing who receives it.
Reading a record card
Every saved record shows its vault assignments right on the card, so you can see at a glance where it's going. One of two things appears:
- Coloured vault chips under “Shared with:” — one per vault, in that vault's color. This record is assigned and will be delivered.
- “Not assigned to any vault yet” — in grey. This record reaches no one. Use the ⋮ menu to fix it.
That grey line is the one to watch for. It's the difference between having the information and your family actually receiving it — and it's easy to miss, because an unassigned record looks otherwise complete.
How many vaults should a record go in?
As many as have people who need it. Some rules of thumb:
- Your will and estate documents — the family vault and the estate/attorney vault
- Financial accounts — usually the family vault; add the estate vault if your executor will need them
- Medical information and the emergency wallet card — the emergency vault, and often the family vault too
- A private letter to one person — a single vault with only that person on it
- Account passwords — think carefully. Only the vault whose recipients you'd trust with the keys to everything.
Checking your work
Once every few months, or whenever you've added a batch of records, do a quick pass:
- Scan your categories for any card reading “Not assigned to any vault yet” and assign it
- Open each vault's Details tab and confirm what's inside is what you'd want that vault's people to receive — both that nothing's missing, and that nothing's there that shouldn't be
Five minutes doing this is worth more than an hour spent filling in records, because it's the step that makes all the others count.
Related Articles
Was this article helpful?
That’s Great!
Thank you for your feedback
Sorry! We couldn't be helpful
Thank you for your feedback
Feedback sent
We appreciate your effort and will try to fix the article