How to Add Documents and Records to Your Vault
Here's the shift that matters most: your vault doesn't just hold files anymore. It holds records — and a record is the actual information your family will need, typed into fields, with the document attached alongside it.
Think about what happens if your spouse has to call the life insurance company next week. A photo of the policy is better than nothing, but they still have to squint at it to find the policy number. A record puts the carrier, the policy number, the coverage amount, and the beneficiary right on the screen — and keeps the PDF attached underneath for when the company asks for proof.
Step 1: Pick the right category
Down the left side of your vault you'll see eight categories. Each one opens into subcategories, and each subcategory has a form built specifically for that kind of thing.
- Personal — IDs, children & dependents, photos, vital documents, online accounts
- Assets — financial accounts, property, life insurance, crypto, vehicles, business interests, valuables
- Debts — credit cards, mortgages, personal obligations
- Legal — will, trusts, power of attorney, health directives, guardianship
- Health — medical insurance, medical history, emergency wallet card, pets, elderly care
- Funeral — funeral instructions, burial plots
- Personal Wishes — messages to specific people
- Recipients — the people who will receive your vaults
This matters because the form changes. A financial account asks for the institution and the last four digits. A passport asks whose it is and when it expires. Putting things in the right place is what makes those questions show up.
Step 2: Fill in the fields
Scroll down inside the subcategory and you'll find the form. Fields marked with a red asterisk are required — usually just one, so you can save something useful fast and come back to finish.
Two field labels are worth understanding, because they're doing work behind the scenes:
“drives reminders”
Fill in this date and your vault will start warning you before it matters. Put your passport's expiration date in and you'll hear from us six months out — not the week before a trip, when renewal takes eight weeks.
“checked against your Will”
This is the beneficiary the institution has on file — the name the bank or insurance company will actually pay. That designation legally overrides your will. If your 401(k) still names an ex-spouse, that's who gets it, no matter what your will says. Recording it here lets your vault flag the mismatch while you can still fix it.
What each form asks for
A walkthrough of the most-used ones:
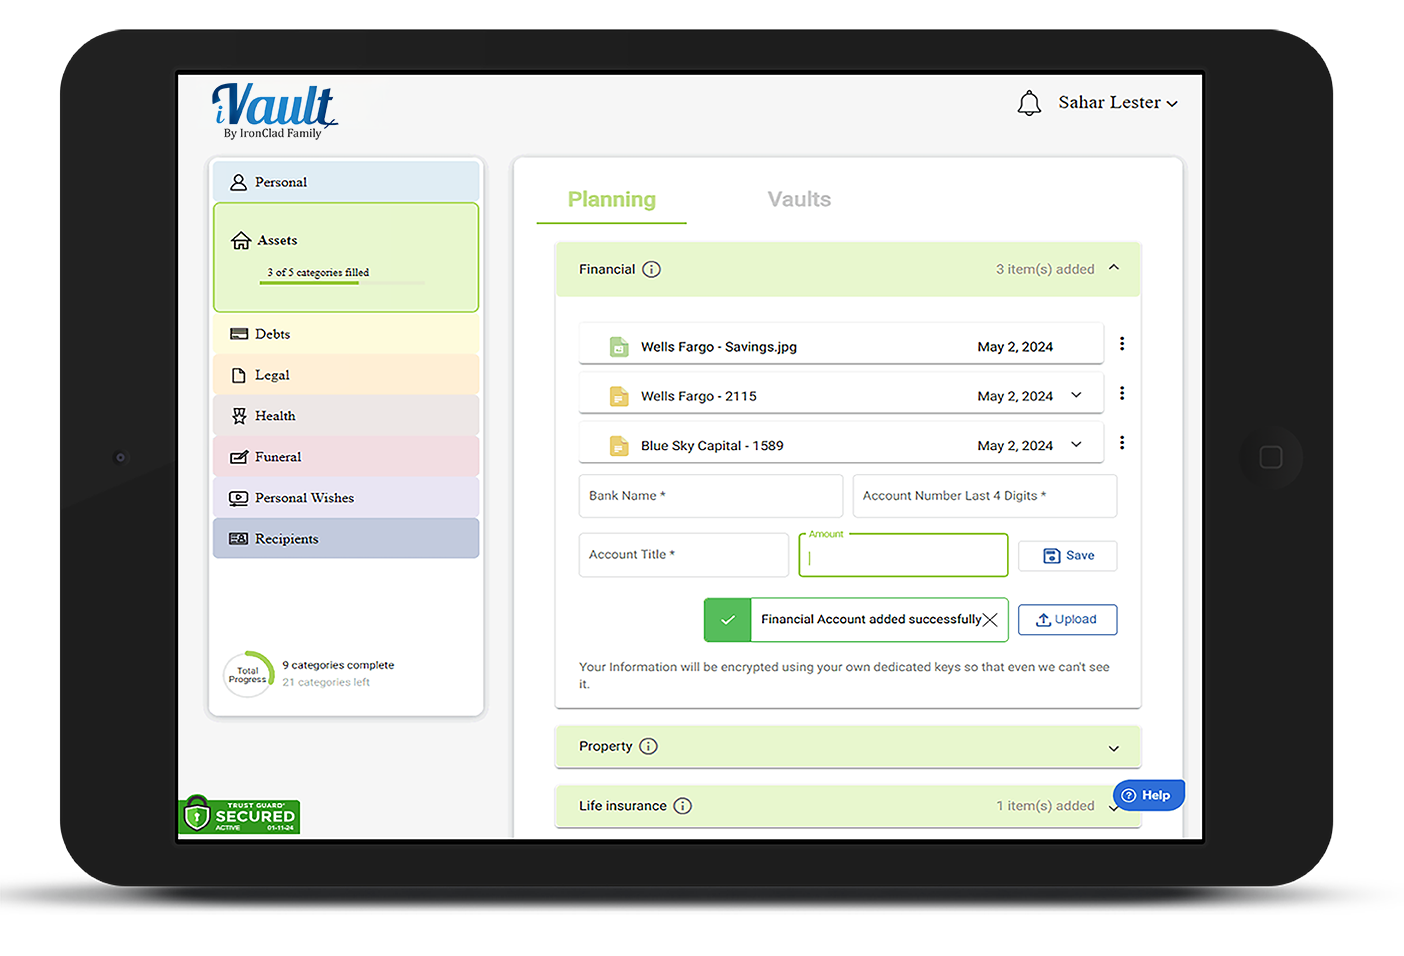
Financial accounts (Assets › Financial)
- Account type — checking, savings, brokerage, 401(k), IRA, Roth IRA, 529, HSA
- Institution / bank name — required. Just the bank's name.
- Account number (last 4) — only the last four. Enough for your family to identify the account when they call; not enough for anyone to do damage.
- Account title — whose name the account is in. Joint? Yours alone? This decides whether your spouse can touch it immediately or has to wait on probate.
- Who did the bank list to receive this account? — the payable-on-death name. Most people have no idea what's on file. Worth a phone call to find out.
- Amount — a range, not an exact figure, so it doesn't go stale every month.
- Next review date — drives reminders. Set it a year out and you'll get a nudge to re-check the balance and beneficiary.
Life insurance (Assets › Life insurance)
- Policy type — life, health, auto, homeowners, renters, disability, umbrella, long-term care
- Carrier — required
- Policy number — the first thing the claims line will ask for
- Coverage amount — so your family knows what they're entitled to claim
- Named beneficiary on policy — checked against your will
- Renewal date — drives reminders ahead of the renewal
IDs (Personal › ID's)
- Document type — passport, driver's license, state ID, birth certificate, Social Security card, marriage certificate, green card, military ID
- Belongs to — required. Add a separate record for each family member. Four people, four passports, four records.
- Document / ID number
- Issuing authority
- Expiration date — drives reminders at 180, 90, and 30 days out
Online accounts (Personal › Web, social media & devices)
- Service / site — required
- Username / email and Password
- 2FA method — none, SMS, authenticator app, hardware key, email. This is the one people forget, and it's the one that locks families out. A password is useless if the code goes to a phone that's been disconnected.
- On death: memorialize / close / transfer — what you want done with the account. Your family shouldn't have to guess whether to keep your Facebook up.
- Last changed — drives a rotation reminder
Children & dependents (Personal › Children & dependents)
- Name — required — and relationship and date of birth
- Who would care for them if you couldn't? — the guardian question. Answer it here even if it's also in your will; this is where someone will look first.
- School or daycare
- Medical or special needs a caregiver must know — allergies, medications, the thing you'd say in the doorway on your way out
- Anything else important about their care
Crypto (Assets › Crypto)
- Asset / coin — required
- Exchange / wallet and wallet type — exchange-held, hardware, software, or paper
- Where recovery phrase is stored — not the phrase itself unless you want it here, but where to find it. Crypto with no recovery path is simply gone. There is no customer service line.
- Who should inherit this?
Pets (Health › Pets)
- Pet's name — required — and type of animal
- Who should care for them if you couldn't? — ask that person first, not after
- Veterinarian, medications or medical needs, feeding and care instructions, microchip number
Vehicles, property, mortgages, business interests, valuables, medical history, elderly care, funeral instructions, and burial plots each have their own form built the same way. Open one and read the labels — they'll tell you what your family would need.
Step 3: Choose which vaults get this record
Below the form is the vault picker, with a checkbox for each vault you've built. Each vault carries its own recipients, so assigning a record here is how it reaches people.
You'll usually want more than one. Your will might go to both the family vault and the attorney vault. Your emergency medical information belongs in the emergency vault, where it can be released right away, and probably in the family vault too. A record with no vault assigned is stored safely — but nobody receives it.
Step 4: Attach the document (optional)
Under Supporting document, choose a file to attach it to this record. One file per record — if you pick a second one, you'll be asked whether to replace the first.
Photos work differently. In Personal › Photos you can paste a link to a whole album — Google Photos, iCloud, Dropbox — instead of uploading files one at a time. Twenty years of family pictures aren't going into a vault one JPEG at a time, and they don't need to. The link goes in; your family gets the album.
Step 5: Save and encrypt
Click Save & encrypt to vault. Your record appears as a card at the top of that subcategory, showing its name, the date you added it, any reminder that's now scheduled, which vaults it's shared with, and the attached file if there is one. Everything is encrypted with your own keys before it's stored.
Changing a record later
Every saved record has a ⋮ menu in its top-right corner:
- Edit details — loads the record back into the form. Change anything, then click Update this record.
- Assign to vault — change who receives it without touching the fields
- Rename — change the card's title only
- Download / File preview — for records with an attachment
- Delete — removes the record and its attachment
This is the part that replaces the old “archive the old one, rename it OLD” routine. You no longer need duplicate records for updated documents. When you refinance, open the mortgage record, hit Edit, and use Replace on the attached file. When the new will is signed, edit the will record and swap the PDF. One record per real-world thing, kept current — so your family finds one mortgage, not three, and doesn't have to work out which is live.
In edit mode, the attached document appears in a banner at the top of the form with two buttons: Replace swaps in a new file, Remove detaches it. Remove is reversible until you save — click it again to undo.
Where to start
If the whole thing feels like a lot, do it in the order your family would need it:
- One financial account — the main one, where the money actually is
- Life insurance, if you have it
- Everyone's IDs, with the expiration dates filled in
- Your will and any directives
- Medical information and the emergency wallet card
Ten minutes on a Sunday gets you further than you'd think. Fields first — documents can follow whenever you get to the filing cabinet.
For your security, support cannot accept files by email or add records on your behalf. Always add records directly from a trusted device.
Related Articles
Was this article helpful?
That’s Great!
Thank you for your feedback
Sorry! We couldn't be helpful
Thank you for your feedback
Feedback sent
We appreciate your effort and will try to fix the article