Managing Client Vaults (Advisor Guide)
This article covers managing a client vault end to end: finding the client, opening the vault workspace, building records, creating vaults, adding recipients, and setting delivery. Follow this sequence and you'll avoid most support issues.
Don't wait for “perfect.” Get the client to safe and usable, then improve over time. A vault at 60% is better than no vault at all — and a client who sees progress in the first session is a client who comes back for the second.
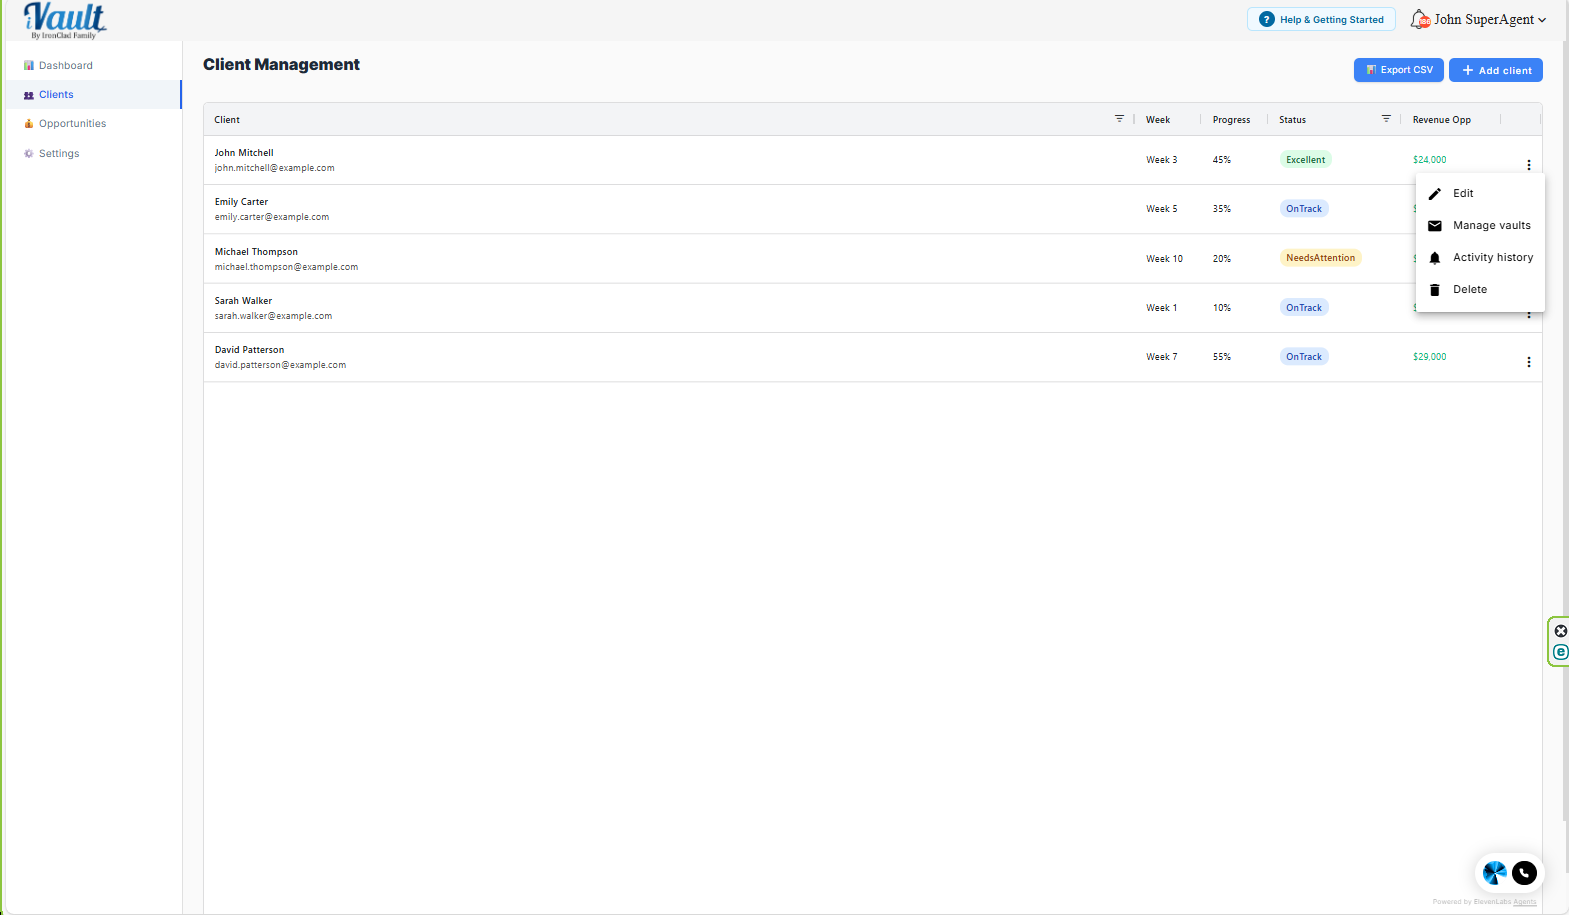
Step 1 — Find the client and open Manage Vaults
- Go to Clients in the left menu.
- Find the client in the list.
- Click the 3 dots next to their name.
- Click Manage vaults to open the client vault workspace.
Step 2 — Assess what's there and what's missing
Your first job in the client's workspace is finding the gaps. Look for:
- Which categories are empty — the left rail shows a filled count per category
- Records marked “Not assigned to any vault yet” — information the client thinks is protected but that reaches nobody
- Whether recipients have been added
- Whether delivery conditions are configured
That second one is the highest-value thing you'll catch. Clients routinely fill in records and never assign them — and unlike an empty category, it doesn't look like a gap. Scan for it every time.
Step 3 — Choose your service model for this client
If the client took the Family Readiness Assessment, they've already told you which of these they want. If not, ask early — getting it wrong burns hours in both directions.
Best for engaged, tech-comfortable clients who want control.
Your role: set up the vault structure, show them how records work, review and fill gaps.
Best for busy executives, elderly clients, low-tech clients, and overwhelmed families.
Your role: build the records yourself from documents they provide, then walk them through what you've built.
A practical middle path works well: you build the financial, insurance, and legal records — the ones requiring documents they'd have to dig out anyway — and leave the personal ones (funeral wishes, messages, pet care) to them. Those are the sections nobody can fill in on someone else's behalf.
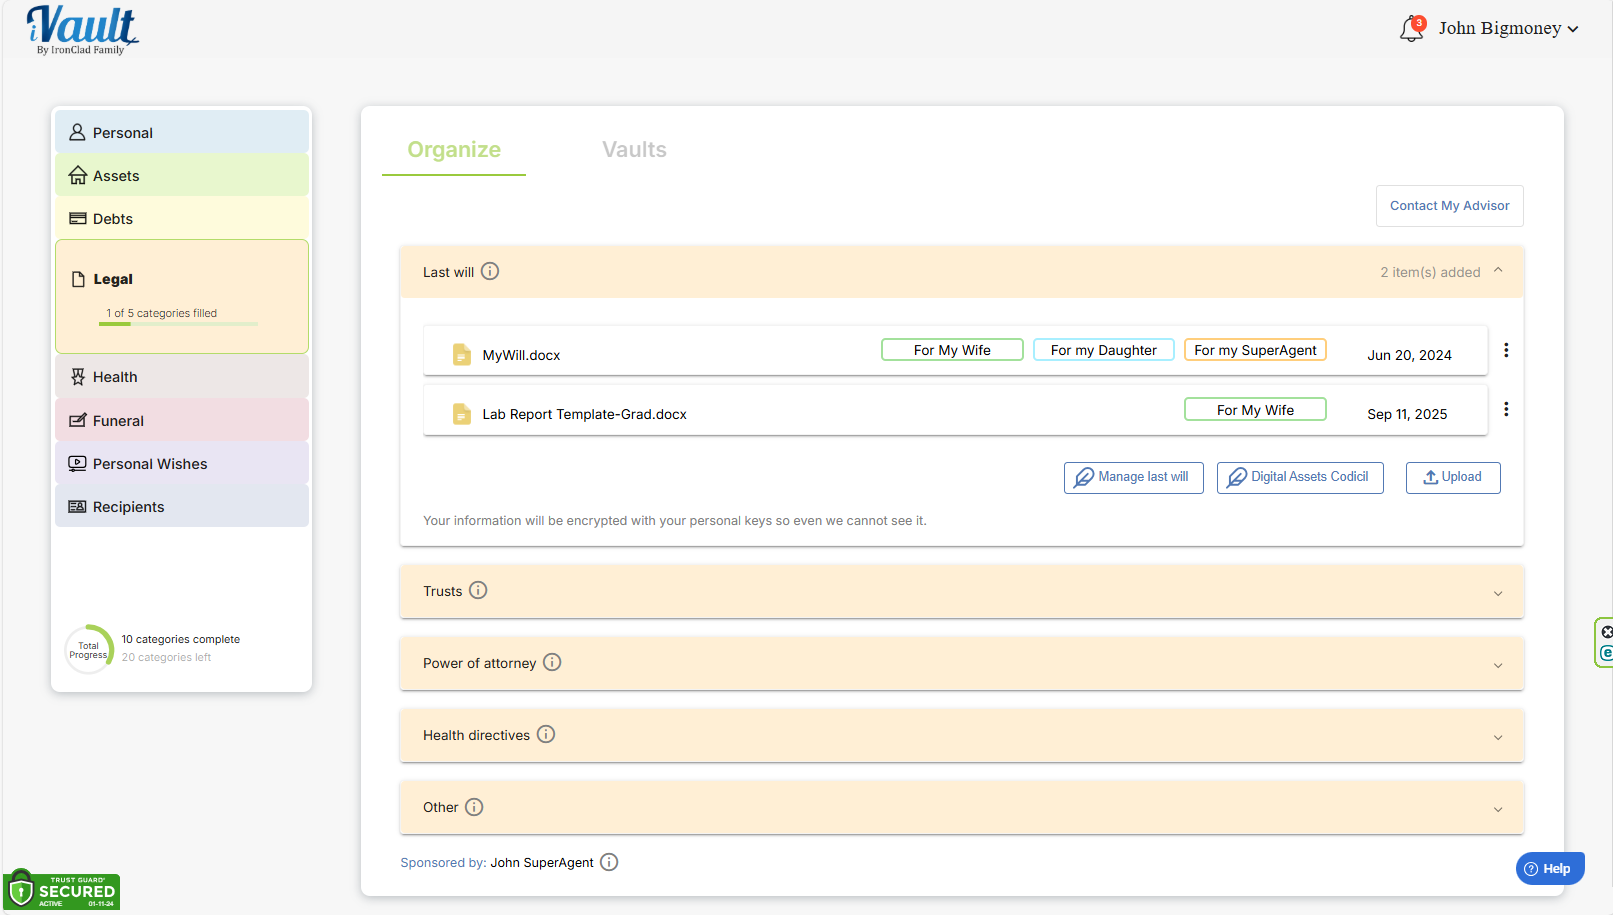
Step 4 — Understand the record model before you build
This is what's changed most, and it's worth two minutes before your next client session.
Documents aren't uploaded into vaults anymore. Clients create records in categories — a bank account under Assets, a will under Legal — with structured fields, and the document attached alongside. Vaults are then the delivery mechanism: you assign records to vaults, and a vault's recipients receive everything assigned to it.
Why this matters for your practice:
- The fields are the value. A scanned policy tells you nothing at a glance. A record shows carrier, policy number, coverage, and beneficiary — reviewable in seconds during a client meeting.
- Beneficiary fields are your opening. Financial, life insurance, and crypto records each ask who the institution has on file to receive the asset. That designation legally overrides the will. Most clients have no idea what's recorded — and finding a stale beneficiary is one of the most concrete pieces of value you can deliver in a single meeting.
- One record per real-world thing. When a policy renews or a will is re-executed, edit the record and replace the attachment rather than adding a second one. Duplicate records are what make a vault untrustworthy.
Full field-by-field detail is in the family-side article, How to Add Documents and Records to Your Vault — worth reading once, and worth sending to DIY clients.
Step 5 — Create the vaults
- Navigate to the Vaults tab in the client dashboard.
- Click Create Vault.
- Type a Vault Name.
- Choose a Color — it appears on every record card assigned to that vault, so it's how you'll spot coverage gaps at a glance.
- Click OK to save.


Click the vault name to open its settings. Two configuration options appear on the left:
- Delivery Conditions – when and how the vault is released
- Recipients – who receives it (up to 4 per vault)

Step 6 — Assign records to vaults
The step that determines whether any of this works. Two ways:
- While creating a record — tick the vaults in the Assign to vault picker at the bottom of the form. Each vault shows its color and current recipients, so you can see who you're sending to.
- After the fact — open the ⋮ menu on any record card and choose Assign to vault.
Records commonly belong in more than one. A will goes to the family vault and the estate vault. Medical information goes to the emergency vault and the family vault. You're not duplicating anything — one record, several destinations.
Step 7 — Set delivery conditions
Click Delivery Conditions and choose one of three:
- Death or Incapacitation – triggered when the vault owner passes or becomes incapacitated
- Specific Date – milestones like a child's 18th or 25th birthday
- Deliver Now – manual immediate release
Vary these by vault. An emergency vault holding medical information should release on request — it does no good sealed while someone's in an ambulance. Funeral wishes have the same problem: families make those decisions in the first forty-eight hours, often before a death-triggered vault has reached them. Worth raising with every client.
Once a vault is delivered, it becomes a permanent, locked record of exactly what the client intended to share. No one — not the advisor, not the client, not IronClad Family — can alter it after delivery.
This is not a restriction. It is a promise. The client's wishes are preserved exactly as they chose them — so they can never be questioned or tampered with. We are on their side.
If the client needs to update documents later, create a new vault. Client accounts include unlimited vaults.


Step 8 — Assign recipients
Click the Recipients tab and select who will receive the vault contents.
Each vault supports up to 4 recipients. Client accounts include unlimited vaults, so for complex family structures — blended families, adult children in different circumstances, a business partner — create separate vaults per recipient group rather than crowding one.
- Recipients must be created in the Planning tab before they can be assigned to a vault.
- Verify email addresses and phone numbers carefully — delivery depends entirely on them being current.
- Full detail: Adding Recipients to Your Client's Vaults
Because recipients belong to the vault rather than to individual records, the grouping decision comes first. Everything in a vault goes to everyone on it — so a vault a brother-in-law receives shouldn't also hold account credentials.

Step 9 — Share a preview before delivery (optional)
Before formal delivery, share a preview link so recipients know what's coming. Two modes:
- File names only – recipients see what exists but can't open anything
- Full content – recipients can view the actual contents before delivery
This is one of the most underused features on the platform, and it's where a lot of advisor value lands. A client's adult children knowing that this exists, that their parent thought about it, and roughly what they'd be handed — that's a relationship with the next generation, built before you need one.
A working review cadence
Once a client vault is live, a short quarterly pass keeps it accurate and gives you a natural reason to be in touch:
- Filter for unassigned records
- Check beneficiary fields against the client's will — particularly after any marriage, divorce, birth, or death in the family
- Confirm recipient contact details still work
- Look for records with empty date fields — renewal, expiry, and review dates are what keep the vault from quietly going stale
- Ask what's changed since last time. A refinance, a new account, a move to another state — each one has vault consequences the client won't think to mention.
Related Articles:
Was this article helpful?
That’s Great!
Thank you for your feedback
Sorry! We couldn't be helpful
Thank you for your feedback
Feedback sent
We appreciate your effort and will try to fix the article